Someone mentioned in my last Materials class that perhaps macrame might be a good option for attaching the wood pieces to each other. I don’t know much about macrame, but just checking today, I found this website with some fairly easy patterns.
I made a test piece using a Loop knot to make a Chain braid. It’s flexible, as Olga mentions on the site, which means that it will help solve my problem of how to wear the dress and still have the flexibility to move around.
I’m not sure of how to attach the macrame pieces to the wood…but maybe I can use some type of small metal ring. I’m going to try connecting some pieces together and see how it goes.
I’ve spent a good deal of time recently experimenting with mixing different strengths of dyes and water, and mixing them together to find the believable skin tone shades. While this has been fun, it’s also been really tedious since skin isn’t just light or dark brown, it’s also a little red and a little green and yellow. I’ve been mixing and mixing…and it was just today that I added the red. I think I might be getting a bit too specific, in that I’m trying to find the “right” shade, even though in the end, it’s going to look like wood that’s been dyed, no matter how much time I spend mixing. What I might try is to hold a few shades up to someone, and then take a picture. Cameras tend to flatten shades and from far away, I’m not sure if I would really be able to notice the individual fluctuations in skin tones, so I’d just see the overall tone (and be satisfied!). Eventually, I’m just going to have to stop and move on. But, I think I’m close.
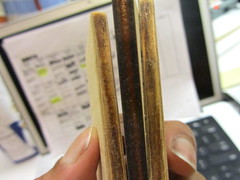
The wood I’ve been using has been balsa and bass wood, that I found at Blick. I’ve been cutting them into 1″x3″ rectangles. For a while, I was using both types of wood but I’ve just been using the bass wood for now. The color is more consistent and the texture is smoother, which makes experimenting with shades easier. I guess it could be argued that skin is not always smooth and consistent. Alright, well, I just like it better. Plus, it’s cheaper.
In mixing the shades, I used a medicine dropper for infants to be precise in my measuring – not only so I can remake the shades again, but also so I can use tiny amounts of dye at a time. The dye is aniline dye, both in liquid (brown, red) and powder (blue, yellow). The dye is extremely strong, so only a tiny, tiny amount is needed at a time. The dropper lets me use 0.2mL of dye at a time, whereas for the powder I found this little plastic/rubber thing that has very shallow rectangles that I can fill with dye. Each little rectangle is about the size of a fingernail clipping, so these are very tiny rectangles. I think I prefer the liquid dye. It’s easier to work with; I’ve found very small particles of blue dye on what I thought was clean bass wood, which is annoying and wasteful since I have to start over with another piece.
When I first started, I was using foam cups, and starting over with my mixing everyday. Recently, I started using this Press and Seal plastic wrap and switched to small Dixie cups to store mixed dye so I don’t have to go through the whole process of making it again. The Dixie cups aren’t very storage friendly – not as good as the foam cups – but I can store more stuff on my desk and I don’t need to fill them up completely. And the Press n Seal lets me clean as I go. I also have a little notebook that I’ve written down a bunch of colors in and given them code names, like P1R20Y1G3. I just write down the ratios and how much water to dye I added so I can remix the colors again, if needed. For instance:
P1 = .2mL dye/25ml H20
R20 = .2mL dye/100mL H20
Y1 = 1rect of yellow dye powder/100mL H20
G3 = 3:1 ratio of green to water
…and so on. This can go on forever. I just bought the red today, so I’m looking forward to finally narrowing these colors down. I’m determined to find my skin color, which is hard to find anyway. I think if I can find me, I can find anyone.
So, I’m now researching wood, wood stains, and bindings. I’ve got a good idea, sort of, for the wood stains – just mix until I get a color that sort of looks like a skin tone. Repeat. The difficulty will be in getting quality dyes, doing the mixing, and preparing and finishing the wood.
The bindings, or how to connect everything together, is a challenge. It’s easy with foam core and hot glue, but now I’m thinking of the wood. Hot glue is not going to cut it. I sort of worked out this thing with twine…. I don’t know. Looks ugly to me. The difficulty is the fact that the pieces need to attach both vertically and horizontally. It’s the side-by-side stuff that screws everything up.
My next activity is to brainstorm more on the binding aspect. I’m going to try researching samurai costumes, since that’s what everyone says my prototype reminds them of, and also Hussein Chalayan’s work. I’ll also just try sketching out a few ideas and working more with twine and the pieces of wood.
In Frame by Frame, my assignment was to create a new piece using video. Originally, I wanted to use this footage I’d picked up on a train ride to Beacon, NY. Here’s a short video of stills from the train ride. Short, fast film
BUT, as it turns out, I ended up sticking with my whole body image theme. As I explained it originally, I had the idea to tackle plastic surgery. I wanted to take a picture of a face and then turn it into a face that had seriously been “augmented” with plastic surgery.
Then, right around the week before the project was due, I got this book about my grandmother. It’s actually her biography and oral history, which is one of the Legacy Projects coming out of Washington State.
As soon as I saw her picture on the cover, I changed my project idea. I decided to focus on identity – the personal identity we use to describe ourselves, the identity of who we are in our families, and the basic identity we have as humans and organisms on Earth. With a few images of my grandmother, I was able to morph a picture of her in her 80’s to a picture of her as a young woman, and then finally to me. Then, to add video, I overlaid some clips from a Prelinger Archive video on conception.
As I did the work, and thinking about the final product, I feel that I was able to capture our simultaneous inner and external identities, while still representing the fears we hold about our aging appearance and ever approaching deaths. And, yet, even with the objective knowledge of who we are and who we originate from, which experience only subjectively and idiosyncratically, in the end we cannot escape science and biology. All of us, every living thing on this planet, starts life the same way – just a bunch of DNA dividing. Lucky or not to be human, despite all the time and effort we put on forward on this earth, no matter how much we may achieve or may not achieve, we can never escape our genetic fate. It was decided at conception.
So, here’s what I made. But, I need to upload a new version without the sound. At this point, I think adding the sound is too early. Particularly because it extends the timeline too far after the video stuff has ended.
Finally, after many tears, I have an idea for my Wearables final! (And, for Materials, too.)
In one of my Wearables classes, we had a workshop where our instructors, Despina Papadopoulos and Zach Eveland, went around to give each of us some one-on-one feedback about our projects. Up until this point, I’d been working along the route of making a pair of pants that turned on a switch or something when you walked. The idea came from thinking about the inner thighs or legs, which seem to come as a “target” area for exercise. But, honestly, my design really didn’t work for a few reasons. I wanted riding pants which someone self-conscious about their inner thighs probably wouldn’t wear. Then, it didn’t really seem to thoroughly reflect a lot of the research I’d previously done.
When Despina came over to see how I was doing, she had difficulty understanding my idea, and we went into the classroom to talk using the whiteboard. Well, she ended up asking a lot of really good questions…that sort of caught me off-guard…on a day or week when my confidence level was WAY low. I sort of ended up breaking down…. Despina gave me some really great encouragement and basically told me that I can’t fail in trying to do something, so I shouldn’t feel like my ideas are crappy. Eventually, I rejoined everyone else, and went back to brainstorming. By the end of that night, I’d already sketched out a new idea. And really, I just figured, “You know, just try it. If it’s crappy, fine.”
While I was thinking of my new idea, I thought of just one part of the body. The skin. And, in relation to my research, I obviously thought of skin color. And then I thought of what could represent skin color. In my Materials class, Peter Menderson showed us some really nice wood veneer samples, for different types of wood and in different colors. Different brown colors…like skin.
Wood. Skin. A wooden dress.
So, right after that night, I immediately started prototyping. First in paper, then in foam core. I used twine to connect the pieces, which I eventually secured with hot glue. So now I have a full dress. I actually can wear it – luckily for me, one of ITP’s dress forms pretty much has my measurements.
Now, I’ll need to look into different types of lumber, wood stains, connections – metal, twine, leather…? – and also just adjusting the height/width of each piece. Fully, my idea is to make a series of wooden dresses, from dark to light, representing a range of skin tones. Unfortunately, given the amount of time left, I don’t think that’s possible.
I made this metal box for Materials. There are 2 sections because it seemed more useful than just one – and it has been. I’ve been using the box for other projects ever since I made it. I need to file down the sides because they’re kind of jagged and sharp, but it’s pretty nice. And it’s magnetic.


