
I’ve been driving myself insane over the past few weeks months shopping for a new computer. So many options, so many new features. (Such high prices!)
During this search, I decided to take advantage of Apple’s 14-day trial period and test out a few of Apple’s newest MacBook Pros. Both of them were seriously impressive machines. If it was my first Apple computer I’d probably go ahead and buy them. But, they weren’t my first Apple machines. These computers were running Catalina which I was unfamiliar with. Due to changes in the operating system, an insignificant number of fonts, files, and several programs I use a few times a year were not recognized and couldn’t be opened. This was too much for me to deal with in those 14-days, so I decided to return the computers and keep exploring my options.
Before returning them to Apple, I needed to wipe the drive clean. Apple has 3 articles outlined on their site on how to do this.
What to do before you sell, give away, or trade in your Mac
How to erase a disk for Mac
About macOS Recovery
Maybe because the instructions are split across 3 different web pages, I got confused and missed a step, wasted time, and finally ended up calling into their help desk.
So for my own reference, let me talk you through my experience. If you need to do this for a computer running Catalina, maybe my experience will help fill in some blanks.
Quick Add: I tested 2 other computers running Mojave and Sierra, since originally writing these steps. I followed these steps each time. I made a few updates where relevant based on those experiences, including a computer with a 3rd-party SSD installed.
Primary Steps to Wiping a Macintosh Hard Drive Running Catalina
These are the main steps to wiping your data from the computer. First you’ll be removing your Apple ID, then wiping security settings like your fingerprint ID. Then you’ll erase the drive and reinstall macOS. The entire process takes 1-2 hours.
For more information, check out: What to do before you sell, give away, or trade in your Mac for Apple's instructions.
1. Create a backup. In my case, since I had transferred files from a backup, I didn’t need this. But if this is your first computer, you should.
2. Sign out of iCloud. This worked exactly as Apple describes it for Catalina. iCloud is available in System Preferences. I think it did require my Apple ID or my computer’s administrator password. (Actually for one of these computers, I didn’t fully log out. Thankfully, you can log into iCloud via another computer and log out that way.)
Update: In 2 cases, I had devices that remained connect to my AppleID despite signing out of iCloud out on the computer. Neither of these devices were running Catalina. I recommend that after you sign out of your computer, visit your Apple ID and check that the device has been removed from your account. You may also need to check your other devices, too (iPhone, iPad, etc). Disappointing this isn’t part of Apple’s instructions.
3. Sign out of iMessage. I didn’t use iMessage, so I couldn’t sign out. (Or maybe that’s why I was still logged in!) In fact, this step was the first time I’d even opened iMessage, which I don’t use. I did see messages from years ago that got transferred over from my original backup file.
4. Reset NVRAM. This is supposed to delete security settings, like perhaps the fingerprint authorization if you’re using a laptop with the TouchBar.
- In order to reset NVRAM, you shut down your computer. When you restart, immediately press and hold Option+Command+P+R for about 20 seconds. There’s no real indication anything is happening. I ended up trying this about 3 times before deciding I was done.
- What should happen is you shut down, press Power, the Apple logo appears. Press and hold the keys, the Apple logo goes away. When you let go after 20-30 seconds, it comes back.
- Note: I tried this on a 2019 iMac running Mojave. The Apple logo went away, then came back on its own after a few seconds. On a MacBook Pro running Sierra, I heard the restart repeating about 3 times until I let go.
5. Unpair Bluetooth devices (as needed). No pairs for me.
6. Erase your hard drive and reinstall macOS. This is the hard part. Apple actually explains this in more detail on another page, which might be why it’s a little confusing.
This section was tricky for me because I mistakenly assumed the options for erasing a drive on Catalina were the same as my other computer running El Capitan. No! Well, I ended up consulting a few sources because none were absolutely clear.
Here are the 13 steps for fully erasing the hard drive.
13 Steps to Erase the Hard Drive (or Step 7 continued):
7.1 Shut down the computer.
7.2 Restart while pressing and holding Command + R. Don’t let go until you see the MacOS Utilities menu. (Actually, you can let go once you see the Apple logo. A language menu will show first.) This boots the computer in Disk Recovery. There will be a few options in Disk Recovery:
- Restore from a Time Machine backup
- Disk Utility [This is what you want]
- Reinstall MacOS
- Get help online (opens in a Safari, only)

7.3 Select Disk Utility. Once you get in here, you’ll see the same Disk Utility as if you’d searched in System Preferences.
7.4 Select View All. This is a critical step!! The drives you need for Catalina (as well as Mojave) are hidden by default. Make sure you complete this step by selecting View All to view all hidden drives.
7.5 Select your drive. Once you’re viewing the full list of drives, after selecting View All, you should select the very first one at the top of the list. You may have given it a new name, but this is your main drive.
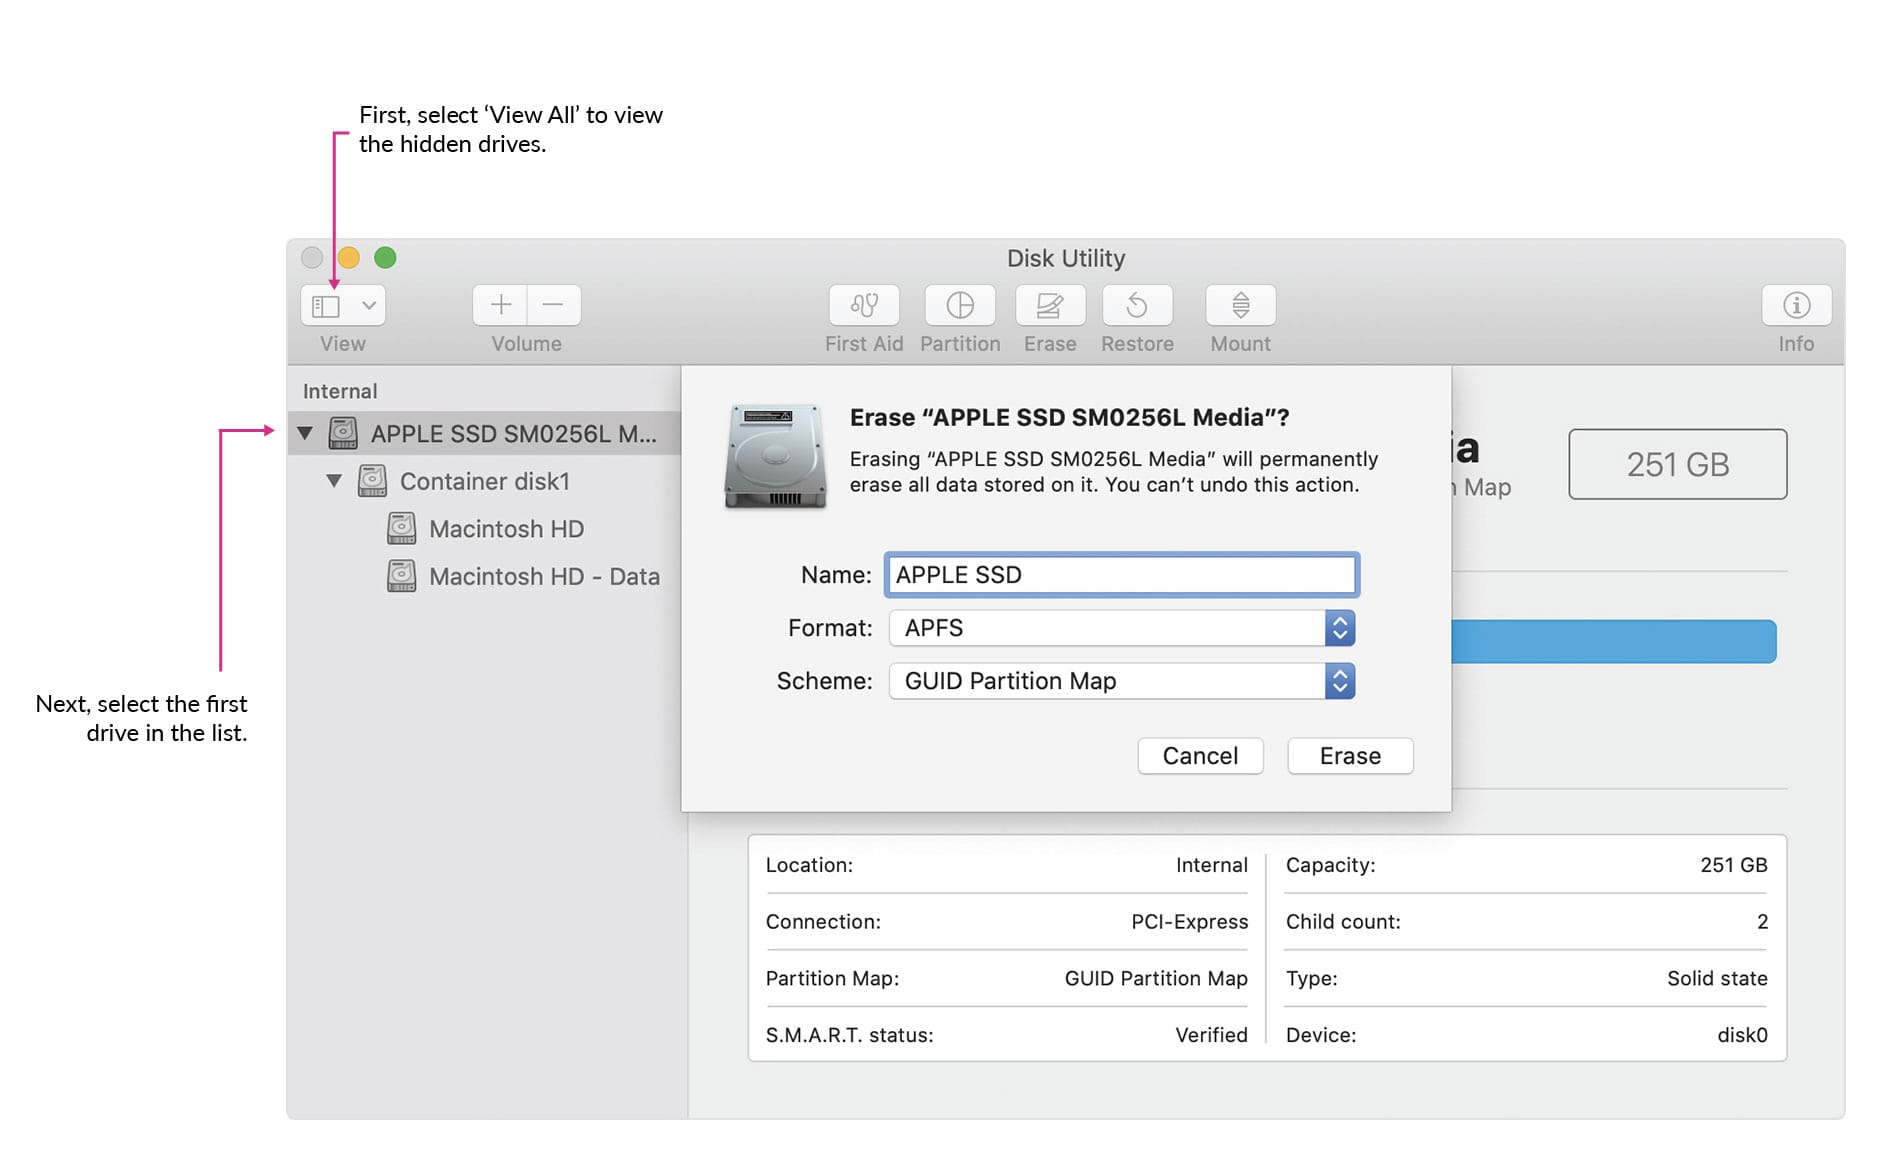
7.6 Select Erase to view erase options. After selecting your drive, the options at the top of the window should include Erase, which should not be inactive at this point. Select Erase to open the menu options for your drive (see image).
- Regarding drive naming options: When I managed to complete this correctly, I was on the phone with an Apple support technician. She told me I did NOT need to name the drive — e.g., ‘Untitled’ was fine. So although the image above clearly shows someone naming the drive Apple SSD, I did not. However…attempting this on that iMac with a 3rd-party SSD installed, it didn’t like ‘Untitled’ so I used the name of the 3rd-party drive.
- The drive format: Apple’s instructions essentially say that whatever pops up as the default option is fine to stick with.
7.7 Erase the drive. Once all options have been made, click Erase. Deleting only takes a few moments. You’ll get a confirmation that the erase was successful.
7.8 Quit Disk Utility. After the drive is erased, you’re done. Close out of Disk Utility. You’ll return to the previous screen, Disk Recovery.
7.9 Back in Disk Recovery, select Reinstall MacOS.
7.10 Select ‘Untitled’ during the reinstallation process. After 7.9, the installation process will ask where to install MacOS. Choose the drive that was erased. It will be named ‘Untitled’ or whatever name you gave it.
7.11 Wait while your computer installs MacOS. You’ll need to be connected to the internet. If not, you’ll get prompted to select a network and password if you don’t have a wired connection. This step will take about 45 minutes to one hour, even though it starts out saying something like 8 minutes.
Notes on 7.11:
- If you did not erase the drive correctly, what happens is you’ll get to almost the end…and then you’ll get a message telling you that Mac OS cannot be installed. This is because the OS is still installed and it can’t be overwritten in this way.
- I’ll also note that you cannot install an operating system your computer didn’t come with using these instructions. You cannot try to rollback to Mojave from Catalina, for instance, using this method.
- These notes are written for Catalina (and other computers that have not had their operating systems upgraded). I do not know what happens to computers that have been upgraded. It’s possible reinstalling MacOS installs the OS originally installed on the computer, or it could be the last OS installed.
7.12 Computer restarts in welcome, setup mode. Once the operating system has been properly installed, the computer will automatically re/start in the welcoming start-up screens that you encounter on a brand new computer. Continue as necessary.
7.13 If you do not want to continue, press Command + Q to quit the start-up and the computer will shut down. If you have a laptop, it will power up automatically when the lid is opened.
Now you’re completely done! Hope that was helpful.
Extra resources:
- Searching further, I found instructions from MacWorld that specifically references Catalina. How to wipe and factory-reset a Mac: the method has changed in Catalina. These instructions were thorough in some ways, but also not correct in others.
- To gain more courage in this process, I watched this video from AppleInsider. It is NOT tailored for Catalina. But it was helpful from an overall process perspective. I’ve queued it to start at Disk Recovery.
Extra Tips:
- Keep the computer plugged in to power.
- Try not to let your computer go to sleep during Reinstall MacOS.
- Use another computer to read instructions vs your phone. It’s easier to search and switch between windows, if you’re not using instructions that are all on one page.
- Back up your data ahead of time, if you intend to keep the files.
Using My Own Instructions to Wipe an iMac Running Mojave
As mentioned, I’ve been on the hunt for a new computer for a few months. I’ve tried 3 different Macs — 2 laptops and an iMac, as the title states. The 2 laptops I bought from Apple’s refurbished store. The iMac was purchased from Other World Computing.
OWC conveyed that wiping the computer was not necessary, but I chose to do it anyway. I referenced my own list above. I only have a few tips to add.
- Definitely check iMessage to sign out. I hadn’t opened it before, and assumed that I hadn’t been logged in. Turns out I still needed to sign out.
- Confirm sign outs via iCloud. Use iCloud to confirm your account has been fully signed out from all computers/devices that you don’t want associated with your account.
- Check that if any licenses or subscriptions need to be deactivated. For instance, I had purchased a second copy of CleanMy Mac when I had the laptops running Catalina. In order to use the license on another computer, it had to be deactivated via the CleanMyMac website. It doesn’t matter that the drive was wiped. In addition, not only could Catalina not run older Adobe software, it also couldn’t run the uninstallers.
- Stick with the default drive format. I was also not exactly sure about the drive format. So I checked the Apple website again, and just stuck with the default choice: “Format: Choose APFS or Mac OS Extended (Journaled). Disk Utility shows a compatible format by default.”