2016 Web/Portfolio update

I’m writing this from the middle of a major update to my website and portfolio.

As I’m currently out of a job – yes, it’s true 🙁 – I’ve been a lot more money conscious. I’ve come to realize that many of these DIY, portfolio builder sites have been siphoning money out of my wallet for years. I was using the free version of Carbonmade, but over time my use expanded in order to accommodate a growing list of projects. Month after month, I’m just paying $7.99. Too much!

So, I decided to get away from that and migrate to a simple PDF. A few reasons for that:

  1. In researching “good” UX portfolios, I found this a post on Creative Bloq, with the top portfolio from a UX designer named Erica Firment. As it happens, we both went to the same grad school at the University of Michigan, School of Information. While her website is very impressive and tells a good story, her actual UX portfolio is a PDF.
  2. The second reason was I found this excellent portfolio guide, published by the University of Cincinnati’s, DAAP school (another personal connection). It’s a very excellent resource in putting together a very nice PDF portfolio.

(I also know that General Assembly published a guide on putting together a PDF portfolio, too.)

So, given this little research, I decided to cancel my online subscriptions and put together my own PDF – which, I’ll be honest, was faster and cheaper than fussing with an online interface. My main goal was to get started, and then upgrade overtime. For the first iteration, I used Omnigraffle. It’s not ideal for this task, but it’s very fast and it handles images really well. Just drag and drop, no “place” necessary. My main goal was to just finish so that I would not get charged for another month for any longer than necessary. At first I followed the Firment model; using icons and a few colors. But, it seemed really kitschy, so I got rid of that in favor clean fonts and layouts.

After finishing that, I decided to move to InDesign, which was the goal all along. InDesign allows me to use the same fonts and styles from my portfolio on my resume, which I’ve been making in InDesign all along. I went with an 11×17 landscape layout, because it will present well onscreen. And, if it’s printed, it will size proportionately and the font won’t look super tiny. It took me about a week to upgrade to InDesign, but now it’s all done. I’m happy.

Moving on now to updating my website…again! Websites are never done, right?
Building up HTML Skill

Normally, I do not spend a lot of my time using HTML or CSS, but I got a little caught up in reading on UX blogs and discussion forums about how web designers and UX professionals should or should not be required to know how to “code”. One person asked why they kept getting applications from UX designers who did not “code” (i.e., design from scratch with HTML, CSS, JavaScript, etc.) their own portfolio site. Those applications, according to the original poster, were apparently not good enough because he wanted someone who could design their own site rather than use a WordPress template or theme.

Much of the debate, which I won’t go into now, had to do with whether or not this type of UX person exists – some said this person is a mythical “unicorn” and the poster would be better off looking for UX designers who had a better grasp of psychology (which is also true). My question, and one of my arguments against this UX People Must Code, is that it does not specify the degree to which a (web-based) UX specialist should understand code. (And really, what they’re specifically talking about is HTML/CSS, not Java or .NET.)

I was curious: how much should a UX person learn about HTML/CSS and how fast can they do it? Well, in my own experience, I’ve found that spending a dedicated but serious amount of time learning something difficult (Russian, OpenFrameworks, driving) will not likely get you to mastery, but it will get you somewhere. I wondered if a UX designer dedicated, say, a month of time learning about HTML/CSS would that get them “far enough”?

I typed into my trusty Google search box “learn HTML in 30 days”…and voila! I came across a great website called TutsPlus.com. This site offers tutorials on all kinds of creative and design related topics, included web design and development. Web Development is actually on a sub-site, called webdesign.tutsplus.com. Turns out someone has already created a 30 day tutorial to learn HTML and CSS. And it’s FREE!

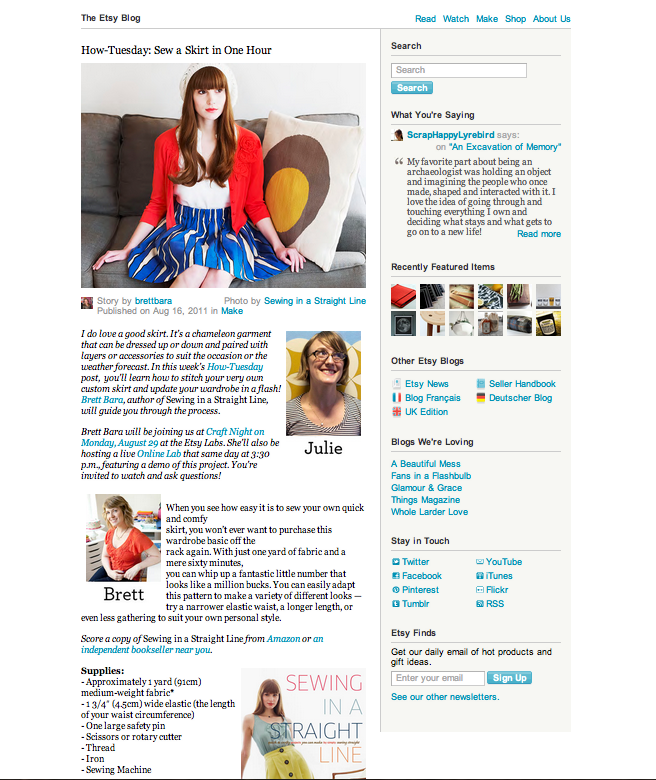
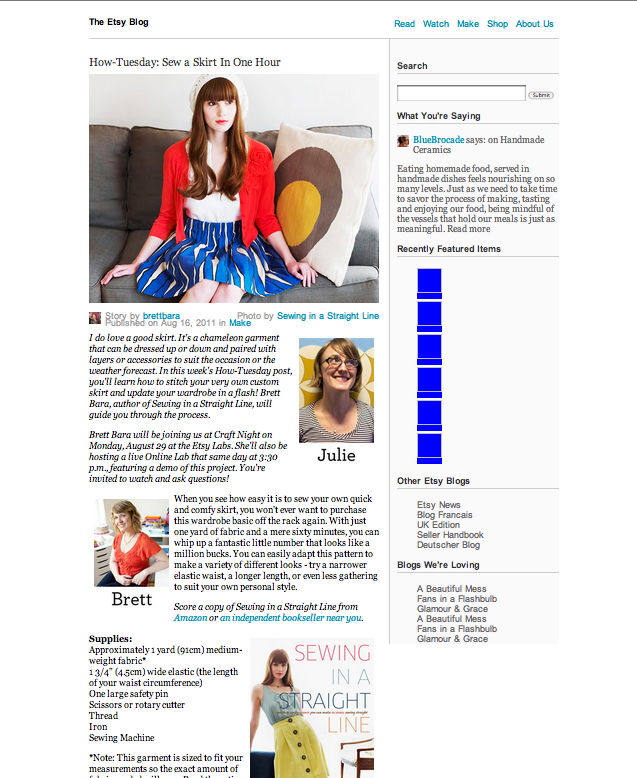
Checking it out, and skipping ahead, I was pretty impressed by this tutorial. I like movies and I love learning via video. The tutorial eventually has the pupil try to skin and recreate a website from a PS template. I became inspired to try something similar. Except I didn’t use a template. I used a page from a real website. It was an Etsy tutorial on how to sew a skirt. (I did make my own skirt, eventually, too.)

I’m still working on it, but I’m over halfway finished. The sidebar is a little bit tricky, so I’m taking a break. I’m using the 960.gs grid in 16-columns, and a few HTML5 tags. There’s not much need for CSS3 yet, but I think some of the buttons will need some styling for gradients and corners. It’s been fun, but I’m not sure I’d want to do it everyday. (Maybe, though…if I had more practice.)

*****

The funny part, is that the part of my brain that is working hard to format an HTML page and troubleshoot what could be going wrong with the CSS does not feel like the same part of my brain that comes up with UX inspirations and designs, and makes the associations between how a person would use a system with what the system offers. More on the Coding Designer later. For now, here’s a screenshot of my sample Etsy project and the real Etsy webpage. There’s still quite a lot of tweaking left to do, but you can see how it’s coming together.

My version of an Etsy webpage
Etsy.com Sew a skirt in an hour

JS Timeline interaction from WNYC

Found this today on Twitter. Can’t wait to try it!
“WNYC Timeline example http://wny.cc/JfeOBU ~ code: http://bit.ly/IY62fw ~”

Here it is on git: A beautiful vertical timeline made with Tabletop.js, Isotope.js & Handerlbarz.js. A collaboration between Balance Media and WNYC/John Keefe.
https://github.com/balancemedia/Timeline

Thesis: The Body Instead

The Body Instead is about exploring the subjectivity and objectivity of the body and the self, using mold-making and casting techniques and materials.

This project questions how the mind perceives the body and the self are explored, along with views about transcendence and immanence in relation to conscious thought and the existence of the self. In this project, a variety of mold-making and casting materials, such as plaster, alginate, silicon and food, are used to recreate and represent the human figure. The resulting cast, as a representation of the body’s impermanence, will be destroyed and subsequently preserved or consumed as food. Ultimately, the goal is to make the body both the source and the object of the aesthetic experience, by combining the experiences of the physical body with the perceptions of the conscious mind.

My thesis is an exploration in materials, using the body and the self as subjects, excluding our notions about body image and personal appearance. I am recontextualizing the image of myself using different materials to represent my body and I am exploring the relationship between the external (camera) “eye” or lens, the eye of the mind, and the I of the self. I will be exploring my self-image and my conscious and unconscious reactions to experiencing myself as an external physical object and as a concept.


Proposal for Giant Stories final

I live in a good neighborhood for going out, or finding many, many adults under 40 hanging out in bars. Last night I was walking home and passed by a cab that had picked up 4 people. A girl was talking, but seemed little uncomfortable with not being hidden in the back. The cab driver definitely seemed like he’d prefer her sitting in back. Another cab was behind that one, and it had 1 or 2 people in it, one passenger talking on the phone. I wanted to know what the person in the next cab might have been doing, but it was empty. So I got the idea to make a video of people in taxicabs, as some kind of an ‘idiot with a tripod’ video featuring people in taxicabs.

I think the subject is interesting because people in cabs have a personal-public existence. I think cab passengers feel sort of self-important. Compared to the subway, bus or walking, it’s not cheap to ride in cabs. And, when you’re in a car there’s some kind of boundary between you and everyone else; it feels so good to get out of it and have some fake privacy. This self-important privacy is fake because taxicab passengers are not car owners, who have the pride of owning a car to help them feel important and so their privacy is really their own. For taxicab passengers, there’s a driver so they’re never alone and they just stepped off the sidewalk where I’m still standing. Plus, they’re in a car painted to indicate that they’re in a car that’s not their own. So, I like the idea of peeking into their false privacy.

To do the project, I will set up at a couple of intersections in NY, and focus the camera on people in cabs while they wait for the light. I’ll try to get a couple of intersections, maybe 5 major ones. And get some video of people at different times of the day, starting with early morning (if possible), mid-day, to night. Possible intersections might include: Columbus Circle, 14th Street and University, 1st Street and 1st Ave, 6th Ave and ???. Or, maybe I’ll just take video of intersections on the F-line so it’s easier for me to get home. I’m not sure how I’ll present the videos right now, but I was considering some kind of structure/installation.

Visiting Japan…in my own mind (with Photoshop!)

For Spring Break 2011, a friend and I had the great idea to visit Japan. Neither of us had been there and, remarkably, tickets were very cheap. (Well, as cheap as visiting popular destinations in Europe – less than $1000.) So, with only about 4 weeks until departure, we booked our flight and rail passes, and prepared to depart.

Our flight to Japan was scheduled for March 12, 2011. Unfortunately, this was the day after a massive earthquake hit Japan and the eastern coast of the country was hit by an equally massive tsunami. (Not sure there’s such a thing as a tsunami that isn’t massive.) We ended up canceling our trip.

The following week, I found myself with a week of time I hadn’t accounted for. One day, while going surfing the Internet, I finally let myself feel a bit down about not going on the trip. For some reason, I decided to have some fun with photoshop – I found pictures of quintessential Japanese traditions, and inserted myself into them as if I’d actually gone on the trip. It made for some hilarious photos.