Responsive Performance: Spatial Media Final

For my Spatial Media final, I worked with Igal Nassima on a dance-performance, technology project. It was meant to be a site-specific work, that would eventually incorporate choreography with a specific dancer or dance group.

The inspiration for this project was the dance performance “Mortal Engine” by Chunky Move.

Igal was also particularly impressed with the geometric shapes in this short performance, called “Triadic Ballet”.

We also found other dance-technology performances online, such as this beautiful performance called “Frost”.

FROST from Tina Tarpgaard on Vimeo.

As you can see from our proposal, our intent was to incorporate more architectural elements into the stage area of the performance space.

When we actually started to implement the code, we ran into a few problems. First, I’m not so hot at C++ and I felt pretty overwhelmed with the coding challenge. I really appreciated working with Igal, since he’s much more advanced, but it also made it quite difficult for me to really understand what was going on. For example, when I wanted to make a big change to the code, I had to ask for help in order to figure it out. For my section, I used some of the extracurricular work I’d been doing with Jared Schiffman on building grids and changing colors to create different visuals for the project. Igal then incorporated that work into whatever he’d been working on.

We also had trouble with our physical area. Originally, Igal’s designated staging area was too much of a high traffic area for our needs and we had trouble controlling the lighting. We wanted to include 2 cameras, but our lighting/space environment was much too spastic and unpredictable to rely on. So, eventually we shared a space with Molly and Diego, which helped.

We used a one-panel backdrop, a short-throw projector and a web-cam mounted horizontally between 2 AutoPoles. We ended up using 1 camera because we were never quite able to use the TripleHead2Go, despite searching for drivers.

To be honest, I’m not really happy with the end result of our project. Things just didn’t seem to go well from the get go, and I sort of lost confidence early on. By the time we got our code to really work well – as in, the day of – there really wasn’t time for us seriously choreograph anything, aside from general movements you might do when you’re looking in a funhouse mirror. So, during our critique, we didn’t get many useful comments which makes it hard to know how to improve.

I think that for work like this, if you really want to do something spectacular a dedicated performance space is essential, for not just the dancers but also the technologists. And, you also need a space for them to work together. I do remember reading some research on this topic once before, I think at Ohio State University. Their dance and computer science collaboration also had similar difficulties with the collaboration space itself, and the difficulties of miscommunication or of underestimating the amount of time it would take for a computer scientist or dancer to modify their work quickly. I think I assumed that it would be easier for me, since I sort of understand them both. Really, it’s not the same and I’m finding that the lives of dancer or technologist/designer are very, very different. So much so that I think one infringes on the the other. I guess that’s if you want to be a purist and only do dance or only do design. I think it is possible for a dance-tech team to work, but this project I think was doomed from the start, in that I (as the dancer) needed to focus on the programming aspects and not just the dance aspects. If we had separated our work more, perhaps the end result would have been more fruitful…or maybe just more time would’ve helped. I definitely do not think this type of work is easy.

Code is here. I worked on GraphicsTwo.

(Extra work I did with Jared Schiffman.)
_2_1
_2_2
_2_3
_2_4
_2_5

Liveable Interactive Music Player

Introduction

My final project for Physical Computing eventually ended up to be an MP3 player that encourages you to take care of your houseplant. This evolved from a previous idea of making a plant that is more like a pet than a plant. I changed my mind after getting some good feedback from my class when I presented my idea. One of their suggestions was to focus on the emotional aspect of how the plant makes you feel. They also advised that care of the plant needs to be an important aspect of the project.

This is how it works: Press the moisture test button. If the soil is dry, the plant will cry; otherwise, it will laugh. If the soil isn’t dry, you can use the MP3 player. You can advance forward and back through an array of music files. You can also pause the music.

Test Button
Test Button


Not only do you care for your plant, it seems like your plant cares for you, too. Although the interface for this project ended up being dainty and pretty, I do admit that 90% of my time on this project seemed to really be spent on code and trying to get things to work. I’ve written about this project in previous posts, so I won’t recap what I’ve discussed in those. But, they’re here if you are interested in reading through them and understanding more about how the project was generated.

Process Description

Because I wanted to embed the interactive mechanics inside the plant, I spent about 1 week on the wave shield and, while I did get it to work, in the end still couldn’t get it to work so well. Some of the issues I had with it were that I didn’t understand the documentation clearly, the code is in some C-language, and my SD card wasn’t formatted correctly. Eventually, I did get it to work, but by that time Minim was looking pretty good. So, sound was now going to be handled by Processing. I also tested out different motion detection sensors to see what types of results I could get that would fit my needs best. Some of the issues I had were that the sensors were too bulky to elegantly embed inside the plant or the serial data I got from the Arduino was too sensitive.

Meanwhile, I was also thinking about my ICM final and how I wanted to create something separate from my Phys Comp final. Originally, I wanted to make a radio that streamed internet radio stations. However, when I discussed this idea with more knowledgeable people and looked it up online, I got the impression that it would be very difficult to implement. So, I left that idea behind and went to my next idea, which was simply an MP3 player. Wanting to make something more interactive and pretty, I started looking up options for Processing and Minim, and what type of visual display I could make. I looked around for an “audio visualizer” on OpenProcessing.org and found this sketch to work with. After that, I spent a little bit of time everyday trying to figure out how the code worked and augmenting it bit by bit to create something new.

By now, it became obvious that I should just put the two projects together. Deciding to use Minim for my Physical Computing project was a huge relief. Not only was it easier to use and had documentation I could understand, it was also easier to get help since Minim is something that other people at ITP have actually worked with on a somewhat frequent basis. (It’s also in the book).

Plus, I could research more about Minim while I was away at a conference in London for a few days. When I got back the States, I went back to the prototype I’d set up before I left using FSRs as triggers for the playback buttons. The FSRs I switched out for exposed wires, because I really didn’t need the analog input values the FSRs provided. (Plus, I seem to have a tendency to destroy my FSRs.) What I really needed were simple HIGH and LOW values from a digital switch which I made out of small sheets of copper.

To test the soil for its resistance to electrical current, I made what could easily be called the simplest switch ever. Add 2 nails + 5V + ground to wet soil. Test for current. Actually, I learned how to do this from reading the internet, the blog of another student,and talking to yet another knowledgeable person.

As I understand, this switch works when the resistance of the soil changes enough to allow a current to flow more freely. At first, I tried this out with just a bowl of water, but I think maybe it shorted out (?) – you really need a plant or at least the soil to get this to work properly. I also added an LED for my own visual feedback.

So, now I had the buttons and the plant. Eventually, I also had a pretty nifty audio visualizer (which at the time of this writing, I may still try to improve upon). So, finally, I just had to assemble the pieces.

Pretty much I just found whatever I had lying around. I found a picture frame in the junk shelf and used that for the frame. I also had some pieces of cork lying around for a bulletin board I never put on my wall, and I used that to cover the frame and to be a backing for the buttons. The whole construction phase literally took just 1 day. Most of my issues with this project were with the code. Luckily there are more knowledgeable people around who can offer help with the code. It also made it a lot easier to test the switches when the wires were not stuck in a plant.

Now that I’m done with the simplest of functionality, to improve it here are a few things I could do:

  • Make a sturdier interface – use something other than cork
  • Label the buttons
  • Provide more feedback when a button is pressed, such as an LED
  • Make the hardware smaller – so that it could fit into other plants or could be portable
  • Make the hardware wireless – so it can work with your iTunes playlist or another array of music files; e.g., it would just give the go ahead that the plant is well watered and you can now play music
  • Use a larger array of sound files, such as from your computer’s music library or a specific playlist you’ve selected. The issue with this improvement is that Minim doesn’t seem to like audio files that are not .wav or .mp3

Flickr Photos!

Play and Next buttons - more photos on Flickr!
Back and Next buttons - more photos on Flickr!

Using Arduino and Processing together

Today I got up early and fooled around in Processing…for hours. I was playing with the Minim sound library, which I’d planned to use for my Intro to Computing Media project, an mp3 player. After sitting around for so long, I could how I was getting both noticeably older in age, but also wiser about Minim. Why sit around and program something completely different when I could put the two together? Well, my fear with combing my two projects, ICM and PhysComp, was that I’d skimp out on one or the other and not fully challenge myself. However, due to the MEX conference – to be blogged about soon! – my schedule is shorter than I’d like. Something’s gotta give. Sadly, it’ll have to be a little bit here and there on my projects.

Anyway, today, I worked on combining my Arduino code and my Processing code using serial output to play a song. Before discussing this, a little recap:

Create the code to turn on/off LEDs set at a threshold. Using the map() function and an if/else statement, I can now reliably turn off and on an LED as though it were a switch.
Here’s the code for the mapping and if/else statement part:

phoVal1 = analogRead(phoPin1);
  //map the photocell values and turn on the light
  phoVal1 = map(phoVal1, 0, 255, 255, 0);
  if (phoVal1>=0) {
    digitalWrite(pholed1,HIGH);
  }
  else{
    digitalWrite(pholed1,LOW);
  }

Here’s the code for the FSR:

FSRValue = analogRead(analogFSR); // read the left FSR value
  analogWrite(motorpin, FSRValue/4);

The next step was to combine this code with the Minim library in Processing. But first, write code in Processing! Here is where several hours with Minim came in handy. I was able to hobble together enough code to be able to play and pause a song. I haven’t yet created any arrays, for a media list, but that’s next, as well as the ability to move through the array. After that I sent the output in serial DEC to Processing. I just added this little bit of code:

if (xpos > 100){
 song.play();

After that, I was able to use the serial output from the FSR and Photocell to trigger the song.play(); function. I suppose, I could find a audio visualization program to tweak, so that I can make a pretty picture show when a song plays, assuming I play a song.

Next I’ll need to refine all the code, and plan out more of how I want the sensors to interact with the plants. And, I need to get some plants.

UPDATE: Code is not working as expected. Processing is just playing a song when the sketch is run. I need to figure this out some more.

Still thinking about changing my final project idea: interactive plant vs blinky lights?

A discussion Monday night got me thinking about my Phys comp final again. I like the bionic gardening, but I also want something really fun. The other student I was talking with was trying to convince me to do my original-ish LED light board idea. So, at home I thought about it a little bit more.

If I had the time to do this, I’d get 108 RGB LEDs, and a perfboard in 5″ x 5″ squares to measure a rectangle 30″ L x 10″ H. Each LED would be spaced 2.5″ from its neighbor, so that there would be 9 LEDs per square.

The interaction: When a user walks by, the LEDs light up in response. The color of the LED depends on how far or close the user is to the LED board. So, the closer, the more red; basically it goes through the visible light spectrum starting from indigo to red.

In addition, my original idea had sound output as well. Sound might be too confusing. I sort of just like the LEDs. I think this is something that would look spectacular, but I just don’t feel that I have enough time.

UPDATE: Perhaps I’ll just do this on my own, anyway. Seems easier than the UV Sunlight watch, but more difficult than the talking plant. In any case, I need to order ton 0′ parts, soon!

Using the wave shield

Introduction: The idea behind this post was to describe how I attempted to use a wave shield to play a sound using a photocell as the trigger.

Description: Just for the record, the code for the wave shield is really confusing, but I have gotten it to work – though that was a painful process. After about 45-60 minutes, it became apparent that the problem I had with playing the .wav files on the SD card was due to the SD card being formatted as FAT 12, not FAT 16. Then at least another 30 minutes was spent trying to find a Windows computer to reformat the card. (We don’t have authority on the computer lab PCs.)

Now, it plays “ominous noise” and the intro to BBC America news.


Testing the WAV shield

For my next trick, what I’d like to do is to put this code inside the loop for the LED-shadow sketch.

#include <AF_Wave.h>
#include <avr/pgmspace.h>
#include "util.h"
#include "wave.h"

AF_Wave card;
File f;
Wavefile wave;      // only one!

#define redled 9

uint16_t samplerate;

void setup() {
  Serial.begin(9600);           // set up Serial library at 9600 bps
  Serial.println("Wave test!");

  pinMode(2, OUTPUT);
  pinMode(3, OUTPUT);
  pinMode(4, OUTPUT);
  pinMode(5, OUTPUT);
  pinMode(redled, OUTPUT);

  if (!card.init_card()) {
    putstring_nl("Card init. failed!"); return;
  }
  if (!card.open_partition()) {
    putstring_nl("No partition!"); return;
  }
  if (!card.open_filesys()) {
    putstring_nl("Couldn't open filesys"); return;
  }

 if (!card.open_rootdir()) {
    putstring_nl("Couldn't open dir"); return;
  }

  putstring_nl("Files found:");
  ls();
}

void ls() {
  char name[13];
  int ret;

  card.reset_dir();
  putstring_nl("Files found:");
  while (1) {
    ret = card.get_next_name_in_dir(name);
    if (!ret) {
       card.reset_dir();
       return;
    }
    Serial.println(name);
  }
}

uint8_t tracknum = 0;

void loop() {
   uint8_t i, r;
   char c, name[15];

   card.reset_dir();
   // scroll through the files in the directory
   for (i=0; i<tracknum+1; i++) {
     r = card.get_next_name_in_dir(name);
     if (!r) {
       // ran out of tracks! start over
       tracknum = 0;
       return;
     }
   }
   putstring("\n\rPlaying "); Serial.print(name);
   // reset the directory so we can find the file
   card.reset_dir();
   playcomplete(name);
   tracknum++;
}

void playcomplete(char *name) {
  uint16_t potval;
  uint32_t newsamplerate;

  playfile(name);
  samplerate = wave.dwSamplesPerSec;
  while (wave.isplaying) {
    // you can do stuff here!
    delay(500);
   }
  card.close_file(f);
}

void playfile(char *name) {
   f = card.open_file(name);
   if (!f) {
      putstring_nl(" Couldn't open file"); return;
   }
   if (!wave.create(f)) {
     putstring_nl(" Not a valid WAV"); return;
   }
   // ok time to play!
   wave.play();
}

Considering how strung out I feel regarding finishing my finals before I head to London, I hope to make it alive through this particular process. It seems doubtful.

Using FSRs to turn on vibration motorsor

Tonight I was working on putting together some of the pieces for my Android Pet Plant.

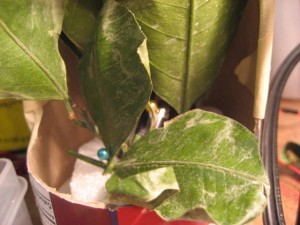
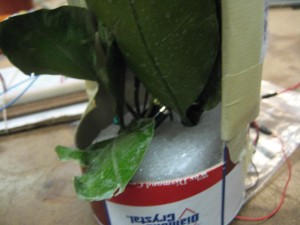
To make the plant vibrate, I plan to use the 1″ FSRs around the flower pot which will trigger at least 2 vibration motors. To test this out, I cut open a cardboard Diamond Crystal salt container and stuck a piece of foam in the bottom of the container. Then I poked holes through the foam and through them I shoved some leaves that I got from someone’s fruit and the two motors, which I taped to the leaves with electrical tape.

On the outside of the container, I attached the FSRs with masking tape and then covered them in this fake leather stuff, which I flipped over so the soft part faced out. I wrote Pet Me on them, too. All of that went into the Arduino and, when I switched it on, I got vibration when I “petted” the pot.

motors
motors


The code was fairly simple. I simply reused something I’d written before. I suppose I should change the code from LEDs to motors, but I’m just trying to make it work for now.

int analogFSR = 4; // FSR analog input
int motorpin = 10; // Motor pin
int FSRValue = 1; // Value of the FSR

void setup() {
  // initialize serial communications at 9600 bps:
  Serial.begin(9600);
}

void loop() {
  FSRValue = analogRead(analogFSR); // read the left FSR value
  analogWrite(motorpin, FSRValue/4);
  Serial.println(FSRValue); // print the FSR value back to the

  delay(500); // gives a 10 millisecond delay
}